So one day during the course of the demolition I climbed up on the roof with our contractor and his two assistants. It only took about an hour or two to bust up the chimney and slide the bricks down into the yard.

It took longer then that to stack them up by the garage!
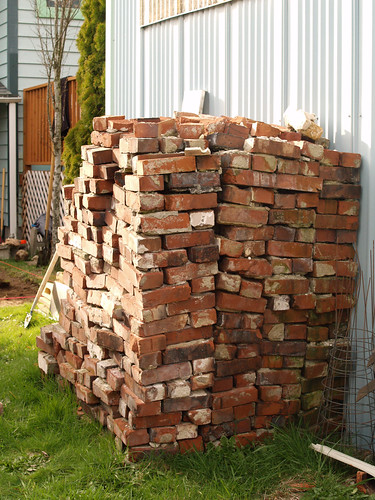
The kitchen project moved on, but the bricks were too cool to get rid of (not that we get rid of much). They were old, uneven, and covered with mortar but we knew that the bricks would get used for something.
This spring we finally figure out what that something was, a patio for the back yard. The back is small and broken up into several separate spaces. There is a nice sized area outside the basement door, another at right angles between the deck and the garage, and then a large space next to the garage where we want to put a raised bed garden (soon!).
Initially we thought we would just put the patio into the space by the door (about 200 sq. feet). However, as we got started it, seemed to make sense to fill in the shaded and almost useless space between the deck and the garage as well (another 200 sq. feet).
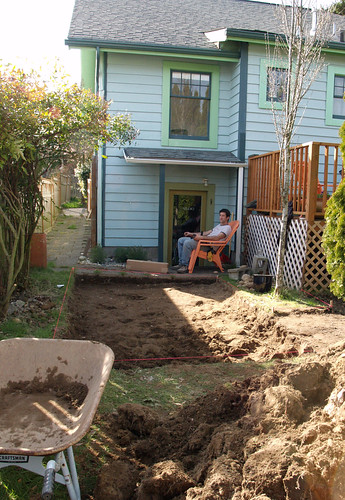
We hunted around online for tutorials and found several that seemed useful. The only problem was that they all looked like they were intended for new construction, flat ground, or simple rectangular spaces (none of which apply to us). The basic concept is simple enough, dig a hole, put in gravel, put in sand, put in bricks. Of course, the devil is in the details. Did we need a weed barrier? Should we slope the hole away from the house? If so by how much, and since we were making an "L" shape that gets complicated! How much gravel? How much sand? So many questions. Our answer was to read them all and then just start digging. We call this the "go go go" method.
We figured on 2" of gravel, 2" of sand and 2" of brick (laid flat) so we dug an approximately 6 inch deep hole. Almost immediately we ran into a problem that goes ENTIRELY unmentioned in all of the tutorials. What the hell do you do with 200 cubic feet of dirt (6" X 400 sq. feet)? We simply piled it up in two big piles and decided we would deal with it later (later has yet to come BTW).
We used some pressure treated wood, and old architectural tiles from salvage for a border. Then we went to the local landscape supply place and ordered gravel and sand. A few days later a truck came and dumped a cubic yard of sand and a yard and a half of gravel which is what they told us would be enough for our hole (and it almost was). The weed barrier seemed like a good idea so we bought landscape "fabric" and rolled it down into the hole before putting in the gravel.
The next challenge was leveling. Our hole was by no means flat, and the gravel was heavy and hard to move. Even with a special purpose gravel/sand rake a friend lent us it was still a pain. After endless discussion about the result we finally just tamped it down with a heavy tamper (also borrowed), and called it good. Then it rained for days (this is Seattle). When the sun finally came back out we jumped at the chance to put in the sand. Heavy. Wet. Sand. Again the leveling was almost impossible until Rae had the bright idea to let the sand dry! Smart that one. We got lucky with the weather and the sand was easy to move once dry, but still hard to level. Eventually we gave up again and agreed it was wabi sabi (this was to become our battle cry).
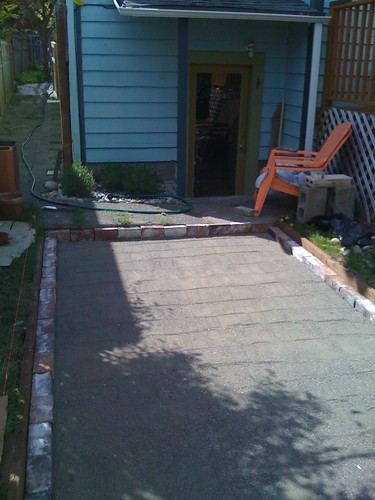
Finally it was time for the bricks! 1200 or so old, crumbly, covered with mortar bricks. Each of which required hand cleaning to get the big chunks of mortar off. Fortunately, Rae likes mindless and repetitive tasks, so she set about sorting and chiseling and scraping and piling. I started setting the bricks in place and trying to get them to fit without having to cut too many. This is where we started discovering lots of little problems. The bricks were not all the same size so the lines were not straight, wabi sabi! The ground sloped one way and the hole another, leaving an inconsistent depth for the bricks, wabi sabi! The sand was not really level and the bricks ended up in "gentle" lumps and waves, wabi sabi. I realize this all sounds like a mess, and it might have been, except we really ended up liking the random features and the tension between order and accident.
It looks good. Really good! The old bricks have a nice worn look making the patio seem instantly aged and permanent. It has this almost European feel as if people had been walking on it for ages. There is just enough pattern and chaos to be pleasing and it is all ours!

More pictures from Rae