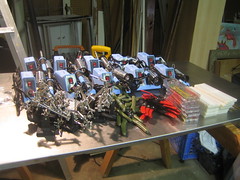
What a great class.
I really appreciate that these busy people were able to come in on Tuesday nights and still be creative.
On reflection the whole "tear apart an ink jet and build something" goal might have been a little bit too ambitious. In the end only one person ended up using the parts to make their project.
Perhaps a straight up motor control class without the recycle/reuse bit would have been better.
The stand out project was the bell ringer that Scott Nance is working on.
He built an amazing set up with the arduino running out to multiple shift registers with transistors on the register output pins to switch an external power supply through the solenoids. The mechanical quality (I did not even get any pictures of the beutiful little spring returned hammers he fabricated) plus the electronics just blew me away.
I think he might have done this before.
Everyone seemed to learn something, and they all managed to get their projects at least started.
I think perhaps that two solid nights just for project construction would have made things easier.
The good people at 911 media arts center tell me that they already have 5 people on a wait list for the next class. This means I get to experiment on a new group of students some time this spring.
In the mean time I need to make some projects of my own!
Here are some little videos I shot of the things that folks were working on.
My thanks to 911 Media Arts Center and the class.
Thursday, December 11, 2008

Saturday, November 22, 2008
re-write URLs under IIS for Drupal
This is mainly a note to myself, but perhaps it wil help someone else as well.
Although all of the sites I work on end up being hosted under LAMP, I develop most of them locally on my XP machine using the built in IIS for localhost.
The only problem I have ever run into (well once I got the whole thing working anyway) is that IIS does not have URL rewriting, and without rewriting there are no clean-urls, and without clean-urls there is no services/AMFPHP.
I just ran across this node http://drupal.org/node/149318 that mentions an OPEN SOURCE Isapi rewrite filter (http://www.codeplex.com/IIRF).
Cool!
Now to install and test it out.
More info will be forthcoming.
Wednesday, November 05, 2008
dorkbot kit night and make blog Woot!
Oh and it looks like my motor control made the Make blog!
Monday, November 03, 2008
Arduino and motor control part 2
arduino linear positioning with an ink jet printer carcass from Josh Kopel on Vimeo.
I spent a bit more time messing with the ink jet guts, and finally had some success getting the linear print head positioning to work. The first challenge was that the motor kept hanging up and moving in big jerks. After burning my finger on the Arduino's voltage regulator, I finally realized that routing all the power through the Arduino was the problem. Now I am running the Arduino off of the USB cable, and I hooked a random 13.5 volt wall wart up directly to the power terminals on the motor control board. Once I got enough torque out of the motor it works quite well.
I am getting a measure of the upcoming challenges though. For one I need to add at least one limit switch so that I can establish a repeatable zero position. That should be fairly easy.
I think there may be a bigger problem dealing with the interrupts from the encoder circuit. When I try to get any feedback from Serial.print() inside my loop{} it hangs up and stutters out only an occasional message. The issue seems to be that the encoder is too precise! The encoder strip has 200 line per inch rulings, and I am currently triggering an interrupt with each 0 ->1 and 1->0 transition. This means it is generating interrupt hits 400 times for each inch it travels, and I think the Arduino is never able to get through a complete loop execution without being interrupted (I can sympathize).
I am going to try just using one of the edge transitions (i.e. low -> high) and see if that helps. It may mean that the code needs to handle the rapid interrupts more gracefully. I can see this being with a very tight loop while the motor is seeking, and then a detachInterrupt() and power down (or set to shorted out braking) while it does anything else.
In the mean time it is fun to zip the motor back and forth.
Saturday, October 25, 2008
Using a DC motor as a servo with PID control (part 1)
PID motor control with an Arduino from Josh Kopel on Vimeo.
MORE HERE IN PART 2
EVEN MORE HERE
I found that the newer ink jet printers often use a combination of a DC motor and an optical encoder to take the place of stepper motors for print head positioning (linear motion) and paper feed (rotary positioning). The pieces often come out (after some effort) as a whole, and they seemed like a natural to experiment with.
The motors themselves are pretty nice if you just want to make something move and control its speed, and in combination with the encoder, I thought I could use them as a free alternative to a hobby servo. I knew there had to be some information out there about using a feedback loop to position a motor, and of course there was. It turns out that the classic way of doing this is through a PID servo controller (Proportional, Integral, Derivative). At its simplest this method can be thought of as a way to use the difference between where the motor should be and where it is (error), plus the speed at which the error is changing, plus the sum of past errors to manage the speed and direction that the motor is turning.
Ok, so I have to say at this point, that I am not an engineer. I did take an engineering calc. class or two, but that was more then 25 years ago, and I never much understood it even then. So all I really have to go on is my intuition about how this is working, a few good explanations, and some example code. As always , Google is your friend. If you do have a good understanding I would welcome your comments!
The first resource I found was this exchange on the Arduino forums and then followed through to an article that really explained what was going on here at embedded.com.
After reading the embedded.com article a few times I put together some simple code, and was amazed to find that the thing worked almost perfectly the first time.
The key elements of the code look like this
int val = analogRead(potPin); // read the potentiometer value (0 - 1023)
int target = map(val, 0, 1023, 0, 3600);// set the seek to target by mapping the potentiometer range to the encoder max count
int error = encoder0Pos - target; // find the error term = current position - target
// generalized PID formula
//correction = Kp * error + Kd * (error - prevError) + kI * (sum of errors)

// calculate a motor speed for the current conditions
int motorSpeed = KP * error;
motorSpeed += KD * (error - lastError);
motorSpeed += KI * (sumError);
// set the last and sumerrors for next loop iteration
lastError = error;
sumError += error;
What is going on here is:
1. read a value from the potentiometer through an analog to digital input (0-1023)
2. map that value so that it lives in the range from 0-3600 (the count from one full rotation of the motor). We need to scale like this so we can make an apples to apples comparison with the current position reported by the optical encoder. The current position is being calculated in another function (an ISR) whenever an interrupt is generated by the optical encoder (more on what this is all about here).
3. create an error term by subtracting the value we want to go to (target) from where we are (encoder0Pos)
4. multiply the error by a constant (proportional gain) to make it large enough to effect the speed. This is the Proportional term, and gives us a simple linear speed value. Basically it says that the further we are from where we want to be, the faster we need to go to get there. The converse is true, so that we will slow down as we approach our destination. Of course, if we are going to fast to begin with, we may overshoot. Then the Proportional will switch signs (from - to + or visa versa) and we will back up towards our target. If the speed is really off then we end up zooming past many times and oscillating until we (hopefully) get to the target.
5. add the difference between the error NOW and the error from the last time around. This is a way to figure out how fast the error is changing, and is the Derivative term of the equation, and you can think of it a bit like looking into the future. If the error rate is changing fast then we are getting close to where we want to be FAST and we should think about slowing down. This helps dampen the oscillation from the position term by trying to slow us down faster if we are approaching the target too quickly. Again, we multiply the value by a constant to amplify it enough to matter.
6. lastly add in the sum of all past errors multiplied by a constant gain. This is the Integral term, and is like looking at our past performance and learning from our mistakes. The further off we were before, the bigger this value will be. If we were going too fast then it will try to slow us, if to slowly, then it speeds us up.
7. set the lastError to the current error, and add the current error to our sum.
The resulting motorSpeed value will be a signed integer. Since the Adafruit controller takes an unsigned int as its speed value I do a little more manipulation to figure out the direction and get a abs() value for the speed, but that part is all pretty easy.
As I said, it seems really simple for such a complicated process. It turns out that the geared motor from the ink jets is much easier to control that some other mechanical systems. The physics of its gears, and the performance curve of the simple DC motor mean that you can be pretty far off on your tuning and it will still end up in the right place (eventually). If we were trying to do extremely precise positioning, or make it all work really fast, or handle huge inertial loads, then it would need to be a lot more robust. I am still working on "tuning " the configuration (i.e. slowly changing the 3 constant parameters one-by-one until it works best) and I will write more about that later.
In the mean time here is the code [SORRY! It looks like the code has vanished, and I cannot find a copy. DO NOT DISPAIR! Instead go here http://www.arduino.cc/playground/Code/PIDLibrary]. Bear in mind that it is designed for use with the Adafruit controller and library. You will also most likely find that it does not work well with the constants I have chosen*. In that case you will need to do some tuning yourself. Stay tuned (hah) and I will show you how I did it.
*discerning readers of code will notice that the Kd constant is 0 meaning that this is actually a PI controller. I found that while the Derivative made the motor settle into position faster, it also injected an enormous amount of noise and jitter. This is due in part to the cheap, noisy, and non-linear potentiometer I am using. I need to do some more experimenting before I can really call it a complete PID.
Oh yeah, if you are taking apart an ink jet you may find these Optical Encoder datasheets to be valuable. These are specific to Agilent parts, but I have found they all share pretty much the same pin-outs.
http://pdf1.alldatasheet.com/datasheet-pdf/view/164530/HP/HEDS-9710.html
http://pdf1.alldatasheet.com/datasheet-pdf/view/163090/HP/HEDS-974X.html
Monday, October 20, 2008
useful bits
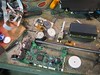
finally started tearing into the ink jet pile looking for useful parts and working on examples for the class. The first victim was a fancy HP all-in-one model. It consisted of a scanner and color printer and had sd and flash card sockets built in.It turned out to be extremely easy to tear apart. There was exactly one size of torx screw involved and only about 15 of them used. The rest is just intricate plastic snap together, which obviously means snap apart as well. I had to exercise some caution in not breaking the little tabs to make sure I would be able to reuse some of the connecting parts.
The main goals were to strip out the paper feed mechanism with its associated rotary encoding wheel and optical encoder, and get down to the linear print head driver with its position sensor/encoder strip. Along the way I also uncovered a small motor and encoder wheel in the ink waste tray, and the stepper motor for the scanner head. this last was especially nice as it came out with its gears, belt drive, and linear bearing axle in one unit. I took some not very useful pictures to document the teardown: http://www.flickr.com/photos/mrigneous/sets/72157608191419120/
 I already have the paper feed motor running off the Adafruit motor shield and am working on how to connect the quadrature encoder to measure angle and direction of motion. The encoder device itself is dead simple to use as it is on its own little breakout board and only requires 4 wires +, GND, and two channels of signal (so only 2 i/o pins on the arduino). The challenge I am facing is figuring out which pins are used by the motor shield, and if they are the ones that support the interrupt(s) I need to manage the encoder. I will post more pics and code as I get that worked out. If I am successful (fingers crossed) then the same should be usable for the linear mechanism of the print head. In the end I hope to have a general purpose set up for reusing printer internals.
I also took apart an old lexmark printer and it had a very simple stepper controlled print head. The Motor shield really shines here as it took me all of five minutes to get the stripped down print head shuttling back and forth with microstepped accuracy and smoothness. I took a little video (not much plot, but there ya go).
The main goals were to strip out the paper feed mechanism with its associated rotary encoding wheel and optical encoder, and get down to the linear print head driver with its position sensor/encoder strip. Along the way I also uncovered a small motor and encoder wheel in the ink waste tray, and the stepper motor for the scanner head. this last was especially nice as it came out with its gears, belt drive, and linear bearing axle in one unit. I took some not very useful pictures to document the teardown: http://www.flickr.com/photos/mrigneous/sets/72157608191419120/
I already have the paper feed motor running off the Adafruit motor shield and am working on how to connect the quadrature encoder to measure angle and direction of motion. The encoder device itself is dead simple to use as it is on its own little breakout board and only requires 4 wires +, GND, and two channels of signal (so only 2 i/o pins on the arduino). The challenge I am facing is figuring out which pins are used by the motor shield, and if they are the ones that support the interrupt(s) I need to manage the encoder. I will post more pics and code as I get that worked out. If I am successful (fingers crossed) then the same should be usable for the linear mechanism of the print head. In the end I hope to have a general purpose set up for reusing printer internals.I also took apart an old lexmark printer and it had a very simple stepper controlled print head. The Motor shield really shines here as it took me all of five minutes to get the stripped down print head shuttling back and forth with microstepped accuracy and smoothness. I took a little video (not much plot, but there ya go).
Wednesday, September 17, 2008
get back in there
Somewhere a grindstone is spinning and my nose hurts just thinking about it.
It has been a good solid 2 months of non-stop home renovation, code sprint, client support, and acclimatization.
We finally have a working kitchen, a bedroom above ground, and a sense of where things are in the neighborhood.
I have been really enjoying the process.
I think.
Perhaps I am just numb.
In either case I am looking forward to some new developments.
I made contact with the good folks at 911 media arts center (http://www.911media.org/) and we are going to be offering an Arduino class in November. They did an introductory class a few months ago and it apparently went very well.
So my goal is to push one of my favorite agendas and get some creative re-use into the mix.
We are going to be tearing down old printers and using the guts to build our projects.
I think I will order motor shields from adafruit.com and supplement the parts kit with a few extra sensors.
Over the next few weeks I need to start testing bits and pieces of printers to get a toolkit of code/method for folks to use as a starting point.
I am especially interested in using the optical sensors that provide linear and rotational position sensing in most ink jets.
The sensor spits out a quadruature encoded signal from a very accurately ruled piece of film (either round or a long strip).
I am hoping we can use it to make some interesting feedback mechanisms.
I really can't wait to get going on it but I need to clear off a little corner of the garage.
That alone could take a while...
Friday, August 08, 2008
slowly working our way out of the basement
The flooring installer comes tomorrow.
I cannot contain my excitement.
To be able to stroll through the house without being able to see light coming up through the sub-floor... this is progress!
Drywall dust still cakes every surface, and there are long tails of romex extruding from every naked electrical box, but still it is PROGRESS.
On the plus side the basement is not so bad.
Or at least that is what we keep telling ourselves.
The weather has been fabulous.
Paying work has been falling from the sky.
Rae got a really really cool job (at a chocolate factory no less!).
And I got to present at dorkbot.
Yes, things could be much worse.
If only I could start getting the garage shop set up.
Why, life would be peachy indeed.
Tuesday, May 20, 2008
made it
It took eight nine days to drive 3,358 miles (it was not the most direct route). Nine days in the car with my beloved and all the stuff we thought we would need for the next four months. Stuffed. In. The. Car.
In the end I have to say it was a great way to get here (Seattle). A plane ride would have been way too abrupt. Given the hyper-kinetic activity of the last few months (sell house, sell cars, sell possessions, pack house, say goodbye, leave) we needed some time to adjust to all the big changes. We needed time for a few melt-downs and some transcendent vistas. We got both (with the Spam museum as an added bonus). We got to see some of our far flung friends and family. We got to talk about the future and everything else we often don't have time for. In the end, we got to Seattle. We are now ensconced in our little apartment while we unscramble our brains and figure out what needs doing when. Tomorrow the house hunting begins with the inimitable Austin Chester (real estate agent extraordinaire). I am looking forward to it.
For a few pictures I give you Rae's flickr feed. I just want to point out that I took some of those, but not any of the really good ones.
Saturday, March 15, 2008
the long road to Seattle
All my electronics tools are packed away. The work bench is taken apart. I am painting my office (last room in the house!). Two weeks left to get prepared. We list the house April first (fools!).
Then and only then will I be able to get downtown and start packing the studio.
Of all the things you can do as an accumulator, moving across the country might just be one of the most painful. There is only so much you can take with you, and the rest has to disappear. I am planning a major studio sale (stay tuned junk fans) and intend to bequeath whatever might be of use to the hacktory, but in the end I know I will have to throw some stuff out. And that my friends is just not something I want to think about right now.
The only thing that keeps me from despair is Rae's promise that Seattle will have fun junk too. I trust her. Junk happens.
Wednesday, February 20, 2008
exhaustion
Ignite Seattle was a blast!
Everyone who spoke was really good, and there were a few true standouts.
I can't wait for the video to get posted, although I dread seeing myself.
I really want to thank Brady Forrest and the good folks at O’Reilly for putting it on and giving me the chance to expound on MakePhilly.
Now about the title...
We have been in Seattle since Saturday and by the time we leave on Friday we will have:
I am getting very excited about moving though!
Everyone who spoke was really good, and there were a few true standouts.
I can't wait for the video to get posted, although I dread seeing myself.
I really want to thank Brady Forrest and the good folks at O’Reilly for putting it on and giving me the chance to expound on MakePhilly.
Now about the title...
We have been in Seattle since Saturday and by the time we leave on Friday we will have:
- seen 15 houses with our realtor
- had (a combined) 6 job interviews (or a reasonable facsimile there of)
- and driven untold miles looking at neighborhoods.
- delivered 1 Ignite Seattle talk
- visited relatives
- caught up with friends
I am getting very excited about moving though!
Monday, February 18, 2008
crazy
So Rae and I are in Seattle on reconnaissance for our move this spring.
Looking at real estate, trying to do some professional networking, trying not to go insane from the expanding possibilities.
I found out last night that I landed a talk for the upcoming Ignite Seattle on Tuesday (that by the way is tomorrow). Very exciting!
My topic is "fun without function" and I am going to present the codification of our experiences with makephilly and the maker challenge. I am really looking forward to this!
It has been a while since I spoke to such a large crowd, and now is the nervous part. I know I can talk for 5 minutes, the real challenge is how to say it all in JUST 5 minutes. That and how to choose the best pictures (thanks flickr).
Subscribe to:
Posts (Atom)