Friday, September 28, 2007

blue LED POV and the Diecimila hack


the dyslexic pov device

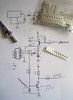
I really wanted to make something cool with my new toys before the last make:philly meeting. I knew there was not much time, so I settled on a POV device. I figured that would be easy to show off, and would be a good way to interest people in the hacktory arduino/freeduino class. As it turned out, the hardware was the easy part. Here you see my attempts to get it to spell MAKE. Obviously I still had some work to do...

tiny blue leds

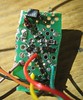
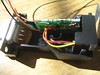
I found these great little smd leds on a junked keyboard pulled from the trash. Soldering them down with their individual current limiting resistors was a challenge. Unsoldering them from the keyboard was a nightmare! In the end I only ruined one. I really want to build a hot air rework unit.

Diecimila hack

Along the way I came across this post. Pure freakin' genius! I used an smd cap instead (because I had it and I am addicted to soldering tiny things), but other then that I can't add anything useful other then to say it works like a charm.

Sunday, September 02, 2007

Doing it the hard way


the Bare Bones "Arduino" from modern devices

I ordered 4 bare bones arduino kits from Modern Devices. But in a moment of false economy decided not to order a USB < -- > TTL cable for them. Instead I decided that I would use some of the parts from the SMD grab bag I got ages ago and make one myself. My old laptop has a serial port, so I did not have to contend with USB, and it is "old tech" so there is lots of info out there.

rs232 < -- > TTL cable schematic
Finding a suitable schematic was as easy as looking at the serial Arduino schematic and finding the rs232 input area. I rounded up all the parts, and used a peice of prototyping board designed for SMD parts from OnePas (http://www.onepasinc.com/). I also dug up a DB9 connector in a plastic box that had enough room for the tiny board I ended up with.

a magnifier is your friend
I have a desk mounted magnifier lamp (which had been in storage unused for 30 years!) and it turned out to be an absolute necessity. Soldering the parts down was surprisingly easy, but working without a design provided the usual set of challenges and opportunities for cursing.

crammed in there
In the end I got it all put together, but I simply could not get it to work. Two days of fiddling, finding mistakes, testing with the scope, trying different computers, and learning the intricacies of rs232 protocols left me no closer to a working cable. In a funk I ordered a USB cable from mouser, and almost gave up.

finished
One final investigation finally revealed the problem. DB9 connectors are number as you look at the BACK not the FRONT! Switch one wire and suddenly the thing works like a charm. One of those things you just need to know.

It is probably the most expensive cable ever built, but I am quite happy with it.